The Battle of El Alamein
Chapter 19
“The End of the Beginning”
23 October - 11 November, 1942

An RAF Kittyhawk MkIII (Lend-Lease P40) takes off for a sortie at El Alamein
The first battle of El Alemein had ended in a draw, with the Germans depleted and the British unable to retaliate in strength. The new British commander, Bernard Montgomery, had come on the scene and intended to wait until reinforcements arrived in Egypt from the United States and the Empire. Even a failed attack by the Germans failed to provoke a response, as “Monty” waited for the perfect moment to strike.
By late October, the British had amassed a force in Egypt that was double the size of that available to the Germans and Italians. Fully appraised of enemy deployments and supply situation due to interceptions by British Intelligence, Monty was ready to strike.

British batteries light the night as they open Montgomery’s attack
The battled opened with a nighttime artillery barrage just after dusk and a diversionary attack by Australian forces. 1,000 British guns opened fire on the Axis lines, followed five hours later by infantry attacks. These were intended to clear the large anti-tank minefields that had been laid by the Germans and Italians, as these weapons were not sensitive enough to be triggered by foot soldiers, allowing them to pass through them and cover engineers as they opened corridors for British armor to press forward. These attacks came in the south, as additional diversionary strikes came in the north. Despite initial progress the advancing tanks, forced into single file through the minefields, were caught in massive, dust clouded traffic jam. By dawn most objectives had not been taken, and the bulk of the armor was still trapped behind the belts of mines.
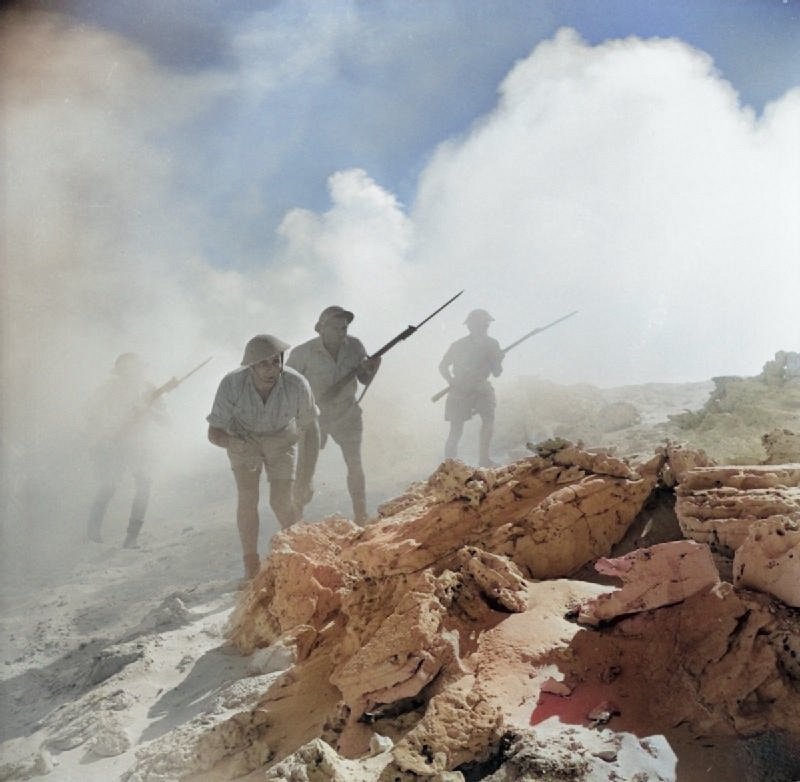
Australian troops advance
Despite the setbacks incurred by Montgomery’s troops, the Germans did not fare much better, as an attempted dawn counterattack by panzer units was repulsed. At the headquarters of General Georg Stumme, the temporary commander of the German Panzer Armee Afrika* since Rommel had returned to Germany for medical treatment, the situation was one of pure chaos. Conflicting, hysterical reports were pouring in from all directions, and the General was forced to drive for the frontline to make sense of it all. As he came under enemy fire the fifty-six year old Stumme suffered a massive cardiac arrest as his driver sped away, later being found dead along the roadside.
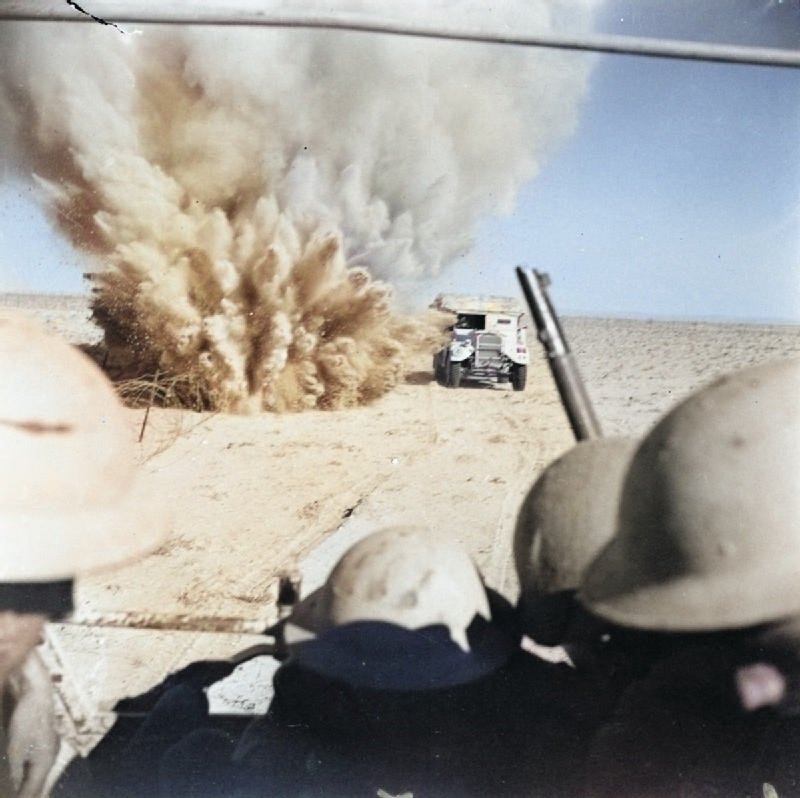
A mine explodes near a British convoy
As Rommel, under direct orders from Hitler, returned to Africa, the battle continued. Despite the return of the Desert Fox the situation was already beyond salvage. The first large armored clash took place on the afternoon of 24 October, with large numbers of tanks destroyed on both sides with no tangible results. After Luftwaffe air strikes destroyed critically needed supplies just behind the lines, additional RAF attacks were directed against the German airfields to ground their aircraft and neutralize that threat.

A German ME109 fighter crashed in the desert, with an RAF fighter in the sky above
Then 25 October dawned it looked as if the attacks had been contained. Advances the previous day had been checked, and the Germans and Italians were working to consolidate their positions further. Another counterattack was launched in the morning by a force of one German and one Italian tank division, but met with no results. An attack later by the British likewise resulted in little results, but another drive near the coast and took the high ground the Germans had designated Hill 28, forcing the Axis forces to concentrate their efforts to retaking this critical point.

Italian troops in an assembly area
As Rommel resumed command, he found his forces in a sorry state. Significant casualties had been taken, and his fuel reserves were nearly depleted. He ordered a major counterattack against Hill 28, consisting of one of his panzer divisions and a German light division, supported by Italian infantry, but this was repulsed after the Italian Bersaglieri managed to reach the western edges of the hill. Rommel responded to this by redeploying most of his artillery into the northern sector, as well as some of his units. This was a risky move, as his rapidly draining fuel meant that these units could not be returned south if needed, but is apparent to Rommel at this point that the main British attack was directed in that area, with the feature known as Kidney Ridge being the main objective.

German light forces advance
The fighting in the north would continue over the following several days, with neither side able to achieve a victory. However, the situation was notably deteriorating for the Axis. The RAF managed to sink tankers bringing in critically needed fuel, and by 30 October Rommel was forced to commit his reserves, signaling to Montgomery that the time had come to launch another attack, this time in the now lightly defended southern sector.

Montgomery observes the battle from his personal M3 Lee tank
By 1 November Rommel, desperate for fuel and reduced to less than 100 operational tanks, was making plans to retreat toward Fuka, 50 miles westward. As tankers were sunk, the only source of fuel for the Axis forces came from smaller amounts flown in from Crete, braving the marauding RAF fighters to land at poorly prepared strips behind the lines. It was in this condition that Montgomery found his enemy when he opened the next phase of his attack: Operation Supercharge.

Churchill tanks move up to the line
The British by this point had 800 tanks available, almost ten times the number in Rommel’s depleted force, and by now the minefields had been cleared enough to unleash then on the crumbling German and Italian lines. With the attack spearheaded by New Zealand troops of the 2nd NZ Division, stiff resistance began to collapse as the day progressed, even as Axis anti-tank guns exacted a terrible toll on the advancing tanks.

An Italian anti-tank gun in action
The spearhead forces suffered horrific casualties as they drove forward, with the 9th Armored Brigade suffering 75% casualties as they charges the enemy guns with their tanks. Despite this, they were able to open a gap to be exploited by the following 1st Armored Division, causing the German lines to teeter toward complete collapse.

British infantry advance in the desert
The situation now untenable, Rommel signaled to the OKW with a request for permission to withdraw. This was met with an order from Hitler himself to stand and fight to the end, with a similar order being sent by Mussolini and the Italian Comando Supremo. An attempt by the shattered remnants of the Axis armored forces to mount a counterattack succeeded in stalling the British advance, but Rommel was forced to order Italian forces into the line to cover the Germans as they began to stage a fighting withdrawal toward Fuka.

A German anti-tank gun position awaits the enemy
As the Axis redeployed their forces the British were doing the same, intending to stage a final breakthrough what remained of the Axis line, and this attack commenced on the morning of 4 November. The initial attacks were held up, as the rearguard of the 21st Panzer Division refused to yield and the Italian 132nd “Arieta” Armored Division fought to the last man, being completely destroyed. Two more Italian armored divisions were also annihilated after fighting spirited last stands. An attempted breakout by the now encircled Italian infantry divisions also failed, as their desperate attempt to march through the desert without water met with an unfortunate, if predictable result.

Lend-Lease M4 Sherman tanks enter the fray, the first time the American design would see combat
Rommel by now was aware that the situation was hopeless. When another request to Hitler to authorize a retreat was not answered, he took it upon himself to order the withdrawal. His broken forces retreated first to Fuka, but the extent of the British breakthrough was such that soon that position also had to be abandoned, with the Germans retreating back to Barida in Libya.

British soldiers examine a knocked out German 88mm gun
The Battle of El Alamein represented the first truly decisive land victory of the Western Allies against the Germans on the ground. Rommel’s vaunted force was decimated, and the Italians had suffered the complete destruction of most of their forces in the western desert. Despite the failure of the British to cut off their retreat, the Axis forces were in serious jeopardy in the North African Theater, and soon a major development to the east would seal the fate of the Battle for North Africa.

A British soldier flashes the “V” sign between two German prisoners
Although estimates vary, between 30 and 50,000 Axis soldiers were captured at El Alamein. An additional 2,000 had been killed between the two Axis nations. 90% of their armored forces in the theater had been lost. The British suffered 2,350 killed and a similar number missing, along with 500 tanks, although more than 300 of these were repairable. The victory at El Alamein signaled the end of the threat to Egypt and the Suez Canal, and served to buoy the morale of the Allies, prompting Winston Churchill to make one of his most famous quotes of the Second World War:
“Now this is not the end. It is not even the beginning of the end. But it is, perhaps, the end of the beginning”